 Features
Display attractive promo banners on different store pages. Hot deals, Specials, Clearance – be in touch with the customers. Draw clients’ attention to certain products. Powerbanners allow you to have an organized, robust, and efficient method to manage media and advertising spaces in the store. You can place a banner of any type, in any location of the page, on any pages. This Magento 2 extension is a must have for any online store.
It does support touch devices like iPhone and iPad, customer can swipe thru the banners. Support multiple screen resolutions and adapts accordinly. Support retina screens.
Comes with slider widget. Select one of your banner sliders, adjust its settings like navigation or slide speed and insert shortcode in your cms page or block.
Full features list
- Add as many sliders as you need
- Responsive layout, adapts to phone, tablet etc
- Touch devices support, swipe to scroll
- Support retina screens
- Slider widget
- Multiple sliders on the same page
- Create your own text styles
- Control banner size
- Organize banners through order
- Over 600 Google fonts
- Compatible with all the modern browsers
- Multi-store supported
- No programming skills required
- Easy to install and configure
- Meets Magento programming practices
Quick Start
- Install Powerbanners extension
- Create your own text styles or use default
- Create new banner slider
You need to create at least one banner slider to start add new banners
- Add new banners to the slider
- Navigate to cms page or static block edit page and insert shortcode or widget.
- Check result on store frontend
Package
Extension package contain following files and folders
- Documentation – documentation in html format
- Extension – extension source code
Installation
We do recommend to install and test the extension on development server before installing it on live store
Extension upgrade
To upgrade the extension to the latest version, follow the same procedure as for initial installation (which is described in the next chapter). Always test the upgrade on a copy of your Magento before you upgrade your live store. Never go live with the upgrade without testing.
Before start
Important
It is highly recommended to install the theme on a test server before you install it on your live store
Backup
Backup store files and the store database.
- Disable the following options: Merge CSS Files, Enable Javascript Bundling, Merge JavaScript Files and Minify JavaScript Files under Stores > Configuration > Developer.
- disable Magento cache – Cache Management
- Enable Magento maintenance mode. To enable the maintenance mode you can create a simple empty file named .maintenance.flag in your Magento’s var directory. Magento will be offline after that. You will need to disable the maintenance mode after installation by removing this file.Refer to Magento documentation for more details:
http://devdocs.magento.com/guides/v2.0/installgde/install/cli/install-cli-subcommands-maint.html#instgde-cli-maint - Log out from magento admin panel ( if you logged in ).
Install
- Unzip extension package
- Navigation into
package/Extensionfolder - Upload content of
package/Extensionto your magento root directory.package/Extension/app>>magento_root/apppackage/Extension/pub>>magento_root/pub
Powerbanners does not overwrite any magento core files
- Set correct file permissions for all the files which you uploaded to your server.Refer to Magento documentation for more details:
http://devdocs.magento.com/guides/v2.0/install-gde/prereq/file-sys-permsover.html - Enable module:
php bin/magento module:enable Nwdthemes_Base Nwdthemes_Powerbanners - Run setup upgrade scripts:
php bin/magento setup:upgrade - Generating static files:
php bin/magento setup:static-content:deploy Powerbanners is now installed on your Magento system.
Common Issues
Do not see powerbanners on frontend
- Magento cache (or external cache) was not flushed after installation of the extension
- Some of the extension files were not uploaded or are broken. Re-upload original extension files to your server (overwrite existing files) and flush the cache
- You edited extension files and accidentally removed or changed something in the files. Re-upload original extension files to your server (overwrite existing files) and flush the cach
Blank page or 404 not found in admin
- Log out from Magento admin panel
- Delete all files in var/cache/ directory
- Log in again.
After extension installation the store gives blank page or an error
- Log out from Magento admin panel
- Change the owner of the uploaded files to the web server user and set correct file permissions for them
- Delete all files in var/cache/ directory
- Log in again
Extension configuration changes do not appear on the frontend
- Flush Magento cache in System > Cache Management
- Clear web browser cache/cookies for your store domain
- Refresh the page in your web browser
Uninstallation
Check this article for a common actions list: https://nwdthemes.com/2016/07/12/magento-2-uninstall-module/
- remove the folder app/code/Nwdthemes/Powerbanners
- drop module tables from database
DROP TABLE IF EXISTS `nwdthemes_powerbanners_style`; DROP TABLE IF EXISTS `nwdthemes_powerbanners_banner_store`; DROP TABLE IF EXISTS `nwdthemes_powerbanners_banner`; DROP TABLE IF EXISTS `nwdthemes_powerbanners_slider`; - remove the config settings
DELETE FROM core_config_data WHERE path LIKE 'nwdthemes_powerbanners%' - remove the module from app/etc/config.php
- remove the module from database table setup_module
DELETE FROM setup_module WHERE module='Nwdthemes_Powerbanners' - flush cache
php bin/magento cache:flush - recompile code if you are in production mode
php bin/magento setup:di:compile
Configuration
Navigate to Stores > Configuration > Nwdthemes > Powerbanners to modify extension configuration
General
- Custom CSS – Add custom css
Text styles
You can create your own text styles for banners. Choose from over 600 google fonts, update font weight, font size and letter spacing.
You will see live preview of chosen parameters
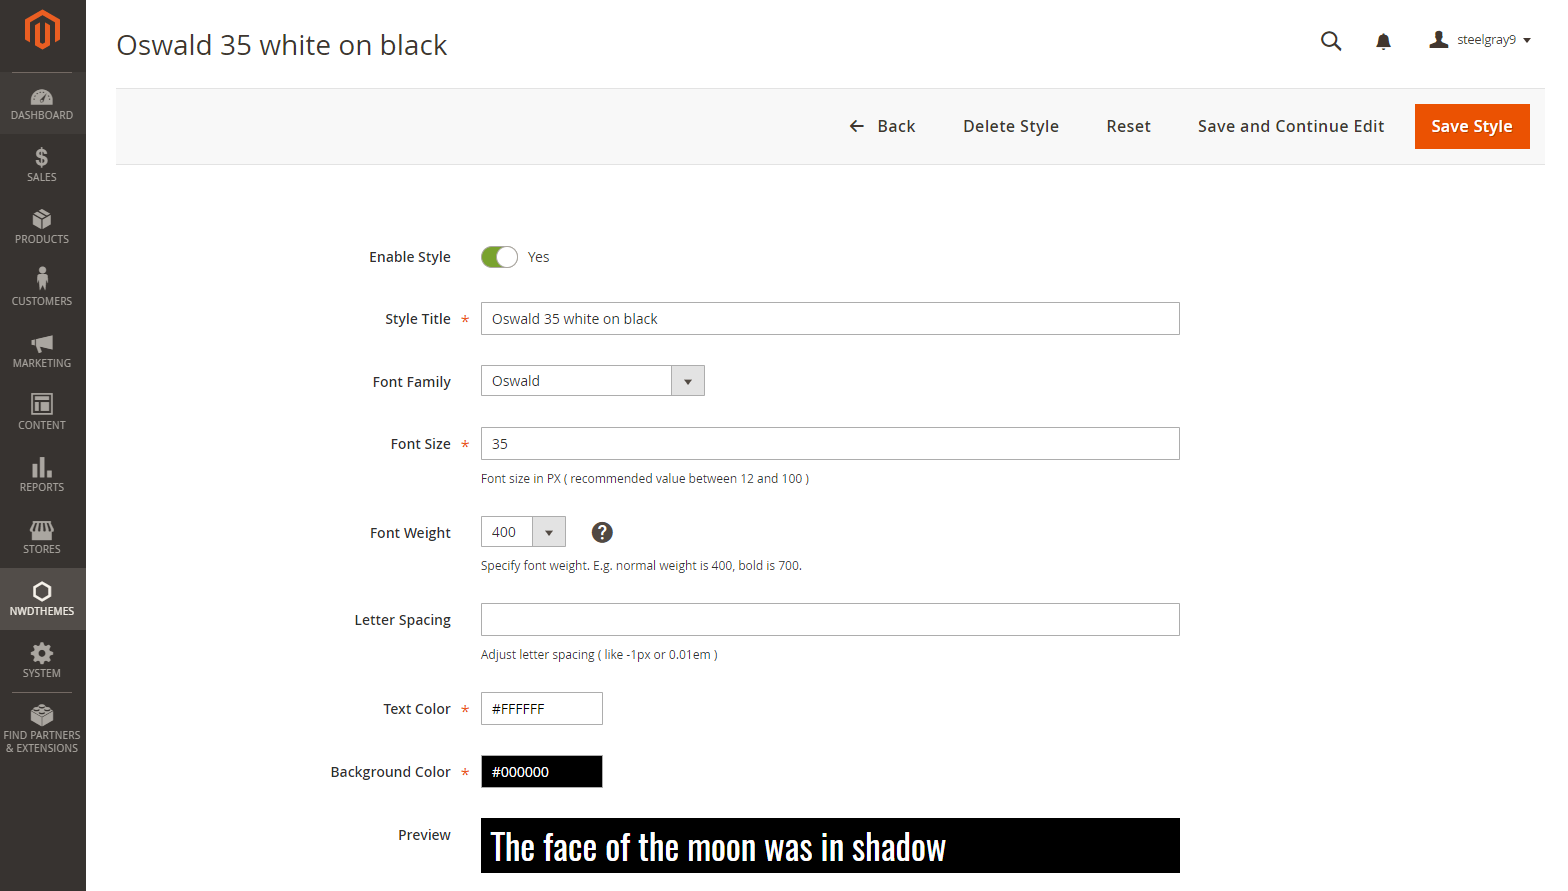
Text style has following parameters
- Style Title – style title
- Font Family – adjust font family
- Font Size – adjust font size
- Font Weight – adjust font weight
- Letter spacing – adjust font letter spacing
- Text Color – style Text Color
- Background Color – style Background Color
- Enabled – style status – Enabled / disabled
- Sort Order – style sort order
Slider
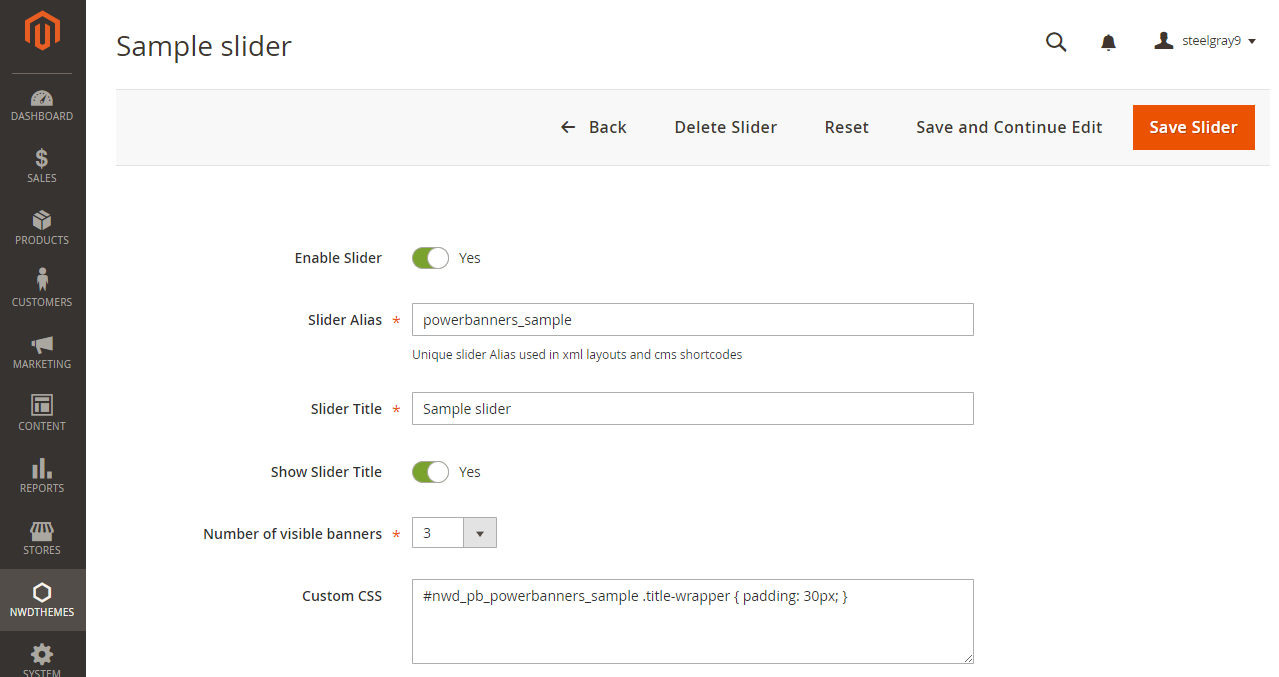
Slider is basically container for banners. You can setup title, number of visible banners and its dimensions, add custom css and setup slider options
Full list of banner slider parameters
Slider Data
- Enabled – Enable / disable slider
- Alias – Unique slider Alias used in xml layouts and cms shortcodes
- Title – slider title
- Show title – show / hide slider title
- Number of visible banners – how much banners per row in slider
- Custom CSS – Add custom css to slider to override default css rules.
Slider class is based on slider alias. If alias = sample, class = .nwd_pb_sample. You can use it to apply custom css for certain slider..nwd_pb_sample .title-wrapper { padding: 30px; } - Sort Order – slider sort order
Banner dimensions
- Banner Width – Banner Width. Banner images will be resized to these dimensions.
Width min/max range: 0 – 1200 - Banner Height – Banner Height
- Banner Width – Banner Width. Banner images will be resized to these dimensions.
Slider Settings
- Autoscroll – Change to any integer ( for example 5000 to play every 5 seconds). Set to 0 to disable autoscroll
- Slide to first item – Slide to first item or stop at last item
- Slide speed – Slide speed in milliseconds
- Stop on hover – Stop autoscroll on hover
- Show navigation arrows – Show / hide navigation arrows
- Navigation arrows mode – Show arrows permanently or show on hover
Slider Banners

Create / edit your banners. Upload images, assign text styles, add link and choose if you want to open it new or same window. Retina screens also supported.
Banner has following parameters
- Slider – assign banner to a slider
- Store View – select banner store view
- Banner Link – Banner Link
- Link Target – open banner link in same or new window
- Image – banner image
- Image for Retina – banner image for retina screens
- Text location – choose text location
- Text Line 1 – Banner Text Line 1
- Text Line 1 Style – Banner Text Line 1 Style
- Text Line 2 – Banner Text Line 2
- Text Line 2 Style – Banner Text Line 2 Style
- Enabled – Enable / disable banner
- Sort Order – banner sort order
Shortcode
You can insert Powerbanners slider in any cms page or static block using this code.
{{block class="Nwdthemes\Powerbanners\Block\Slider" alias="my_alias" }}Please note that my_alias is used for reference. You should change it to your slider alias.
Widget
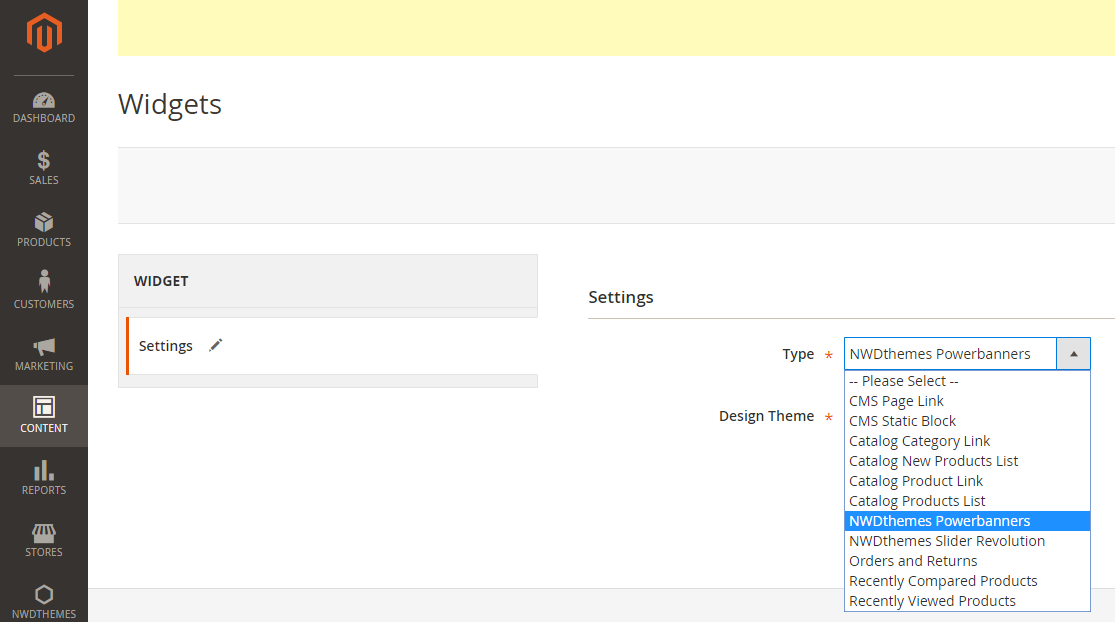
Widget in CMS Editor
To insert Powerbanners Slider Widget in CMS editor click “Insert Widget” icon or button. Select NWDthemes Powerbanners widget. In Widget Options select slider you want to insert and click Insert Widget button.
Widget Instance
To create Powerbanners Slider Widget Instance
- go to CMS > Widget section page
- push Add New Widget Instance button
- Select NWDthemes Powerbanners widget type, choose design package/theme and click Continue
- Fill Frontend Properties form giving widget instance name, assign store views and sort order
- Click Add Layout Update button and select pages and block you want to display widget on
- Switch to Widget Options tab and select slider for this widget instance
- Click Save to update widget options
Xml for Layout
my_alias
Please note that my_alias is used for reference. You should change it to your slider alias.
Magento Configuration
The following chapter describes some of the basic Magento settings and features.
Please note that Magento configuration, installation, maintenance, customization etc. is beyond the scope of our support. But since Magento is very popular platform you can find tons of useful tutorials and articles on the web. Here are some resources for start: Useful links
Cache Management
Magento’s cache management system is an easy way to improve the performance of your site. Whenever a cache needs to be refreshed, a notice appears at the top of the workspace to guide you through the process. Follow the link to Cache Management, and refresh the invalid caches.
To access the cache management screen, you can also use the link in the admin panel menu: System > Cache Management.
Always refresh the cache after making changes in the configuration of your Magento/themes/extensions or after making any custom changes in the files.
http://docs.magento.com/m2/ce/user_guide/system/cache-management.html
Flush cache
Go to System > Cache Management. Click the following buttons to completely clear the store cache:
- Flush Magento Cache
- Flush Cache Storage
Disable cache
Go to System > Cache Management. Click Select All link, select Disable in Actions field and click Submit button.
Enable cache
Go to System > Cache Management. Click Select All link, select Enable in Actions field and click Submit button.
Refresh cache
If the cache is enabled, after each configuration change, extension installation, upgrade or uninstallation always refresh the cache. Go to System > Cache Management. Click Select All link, select Refresh in Actions field and click Submit button.
Index Management
Magento reindexes automatically whenever one or more items change. Actions that trigger reindexing include price changes, creating catalog or shopping cart price rules, adding new categories, and so on. To optimize performance, Magento accumulates data into special tables using indexers. As the data changes, the indexed tables must be updated—or reindexed. Reindexing is performed as a background process, and your store remains accessible during the processes.
To access the index management screen, go to System > Index Management.
You can reindex in any of the following ways:
- using a cron job (preferred)
- using console command which reindexes selected indexers, or all indexers, one time only.
php bin/magento indexer:reindex [indexer]
Help & Support
Please read this documentation carefully, it will help you eliminate most of potential problems with incorrect configuration of the extension and Magento.
If you don’t find the answer to your questions, please refer to this chapter for more information about support policy: Help & Support > Support Policy.
Magento configuration, installation, maintenance, customization etc. is beyond the scope of our support. But since Magento is very popular platform you can find tons of useful tutorials and articles on the web. Here are some resources for start:
Useful links
Documentation
- Basic information about Magento:
https://magento.com/developers/magento2
https://magento.com/products/community-edition - System Requirements:
http://devdocs.magento.com/guides/v2.0/install-gde/system-requirements.html - Magento documentation:
Getting Started
Developer Documentation - Installation Guide:
http://docs.magento.com/m2/ce/user_guide/magento/installation.html
Community
- Magento Forum:
https://community.magento.com/ - Stack Overflow:
http://stackoverflow.com/questions/tagged/magento2?sort=newest - Magento Stack Exchange:
http://magento.stackexchange.com/
Support Policy
Support hours: 10AM – 6PM GMT+1 time, Monday – Friday. The support response time is 24-48 hours.
Support for our items includes:
- Fixing bugs and reported issues
- Responding to problems regarding the item and its features
- Providing updates to ensure compatibility with new software versions
Item support does not include:
- Customization and installation services
- Support for third party software and plug-ins
- Support for Magento: configuration, installation, maintenance etc.