 Features
Powerbanners – push your customers purchase MORE. Creating and displaying banners with Powerbanners is easier than ever. This module allows you to create responsive banner slider to showcase your brands, products or seasonal offers in almost any place on site. Powerbanners is a perfect solution for those who want their visitors to be aware of all hot stuffs.
It does support touch devices like iPhone and iPad, customer can swipe thru the banners. Support multiple screen resolutions and adapts accordinly. Support retina screens.
Comes with slider widget. Select one of your banner sliders, adjust its settings like navigation or slide speed and insert shortcode in your cms page or block.
Check out Powerbanners FAQ for tutorials and features overview
Full features list
- Add as many sliders as you need
- Responsive layout, adapts to phone, tablet etc
- Touch devices support, swipe to scroll
- Support retina screens
- Slider widget
- Multiple sliders on the same page
- Create your own text styles
- Control banner size
- Organize banners through order
- Over 600 Google fonts
- Compatible with all the modern browsers
- Multi-store supported
- No programming skills required
- Easy to install and configure
- Meets Magento programming practices
Quick Start
- Install Powerbanners extension
- Configure extension settings
- Create your own text styles or use default
- Create new banner slider
You need to create at least one banner slider to start add new banners
- Add new banners to the slider
- Navigate to cms page or static block edit page and insert shortcode or widget.
To insert Powerbanners Slider Widget in CMS editor click “”Insert Widget”” icon or button. Select NWDthemes Powerbanners widget. In Widget Options select slider you want to insert and click Insert Widget button.
To create Powerbanners Slider Widget Instance go to CMS > Widget section page and push Add New Widget Instance button. Select NWDthemes Powerbanners widget type, choose design package/theme and click Continue. Fill Frontend Properties form giving widget instance name, assign store views and sort order. Click Add Layout Update button and select pages and block you want to display widget on. Switch to Widget Options tab and select slider for this widget instance. Click Save to update widget options.
For the XML layout use:
my_alias For the PHP code use:
getLayout()->createBlock('powerbanners/slider')->setAlias('my_alias')->toHtml(); ?>Please note that my_alias is used for reference. You should change it to your slider alias.
- Check result on store frontend
Package
Extension package contain following files and folders
- Documentation – documentation in html format
- Extension – extension source code
Installation
We do recommend to install and test the extension on development server before installing it on live store
Before start
Backup
Backup store files and the store database.
- Disable compilation mode in System > Tools > Compilation.
- disable Magento cache – Cache Management
- Log out from magento admin panel ( if you logged in ). This step is required to reset magento access control
cache
Install
- Unzip extension package
- Navigation into
package/Extensionfolder - Upload content of
package/Extensionto your magento root directory.package/Extension/app>>magento_root/apppackage/Extension/js>>magento_root/jspackage/Extension/skin>>magento_root/skin- and so on
Powerbanners does not overwrite any magento core files
- Set correct file permissions for all the theme files which you uploaded to your server.
- Enable & configure the extension – Powerbanners configuration
Common Issues
No “NWDthemes” item in main menu.
- check that all files were uploaded.
- check that all files have correct permissions.
- check that Magento cache is disabled – Cache Management.
I get 404 error in System > Configuration > FAQ Page
- Logout from backend and login back
My configuration changes do not appear on the store.
- refresh Magento cache – Cache Management
- make sure that settings are not overrided on different scope level like website or store view. Scope switch is located in top left corner of Configuration page. More info about scopes – Understanding store scopes
Uninstallation
If you require to disable the extension without removing it completely, go
to System > Configuration > Advanced > Advanced > Disable Modules
Output and disable the module Nwdthemes_Powerbanners
If you want to completely remove extension, follow these steps:
- Disable compilation, in case it is enabled. ( System > Tools > Compilation )
- Login to your FTP, navigate to
app/etc/modules/ - Open the file Nwdthemes_Powerbanners.xml and change the following line:
fromtrue to
false - Clear the cache under
var/cache - Make sure that the site is working properly
- If everything works fine, it is safe to delete the files of the extension.
Configuration
Navigate to System > Configuration > Nwdthemes extensions > Powerbanners configuration to modify extension configuration
General
- Status – Enable / disable all powerbanners instances
- Custom CSS – Add custom css
Text styles
You can create your own text styles for banners. Choose from over 600 google fonts, update font weight, font size and letter spacing.
You will see live preview of chosen parameters
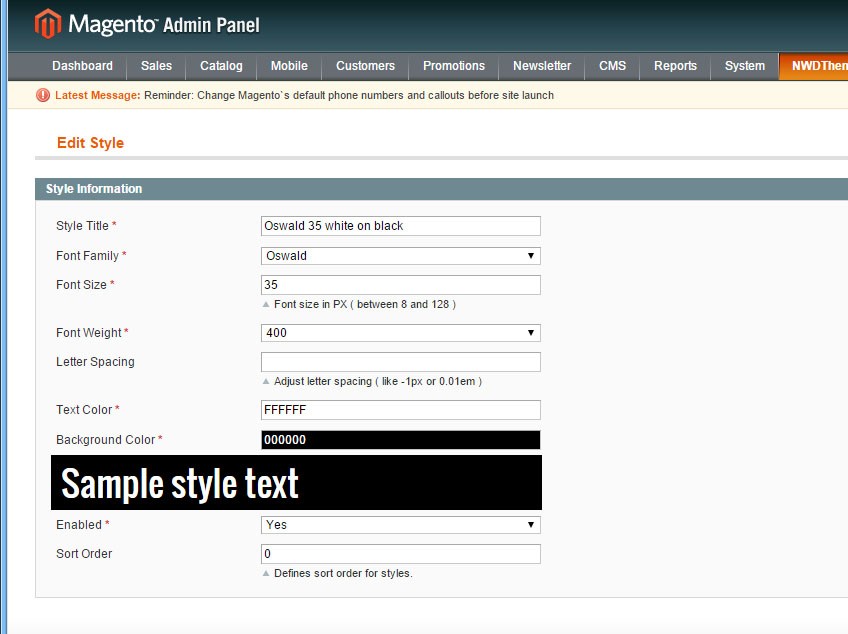
Text style has following parameters
- Style Title – style title
- Font Family – adjust font family
- Font Size – adjust font size
- Font Weight – adjust font weight
- Letter spacing – adjust font letter spacing
- Text Color – style Text Color
- Background Color – style Background Color
- Enabled – style status – Enabled / disabled
- Sort Order – style sort order
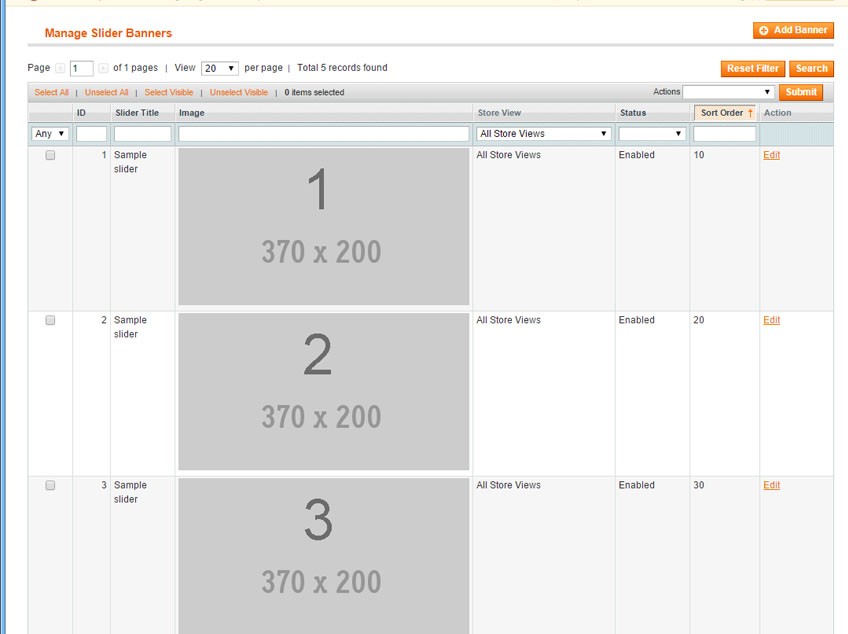
Banner Slider
Banner slider is basically container for banners. You can setup title, number of visible banners and its dimensions, add custom css and setup slider options
Full list of banner slider parameters
Slider Data
- Enabled – Enable / disable slider
- Alias – Unique slider Alias used in xml layouts and cms shortcodes
- Title – slider title
- Show title – show / hide slider title
- Number of visible banners – how much banners per row in slider
- Custom CSS – Add custom css to slider to override default css rules.
Slider ID is based on slider alias. If alias = sample, id = #nwd_pb_sample. You can use id apply custom css for certain slider.#nwd_pb_sample .title-wrapper { padding: 30px; } - Sort Order – slider sort order
Banner dimensions
- Banner Width – Banner Width. Banner images will be resized to these dimensions.
Width min/max range: 0 – 1200 - Banner Height – Banner Height
- Banner Width – Banner Width. Banner images will be resized to these dimensions.
Slider Settings
- Autoscroll – Change to any integer ( for example 5000 to play every 5 seconds). Set to 0 to disable autoscroll
- Slide to first item – Slide to first item or stop at last item
- Slide speed – Slide speed in milliseconds
- Stop on hover – Stop autoscroll on hover
- Show navigation arrows – Show / hide navigation arrows
- Navigation arrows mode – Show arrows permanently or show on hover
Banners
Create / edit your banners. Upload images, assign text styles, add link and choose if you want to open it new or same window. Retina screens also supported.
Banner has following parameters
- Slider – assign banner to a slider
- Store View – select banner store view
- Banner Link – Banner Link
- Link Target – open banner link in same or new window
- Image – banner image
- Image for Retina – banner image for retina screens
- Text location – choose text location
- Text Line 1 – Banner Text Line 1
- Text Line 1 Style – Banner Text Line 1 Style
- Text Line 2 – Banner Text Line 2
- Text Line 2 Style – Banner Text Line 2 Style
- Enabled – Enable / disable banner
- Sort Order – banner sort order
Shortcode
You can insert Powerbanners slider in any cms page or static block
{{block type="powerbanners/slider" alias="slider_alias" }}This code insert new Powerbanners slider in cms block. Slider will use settings from slider configuration. However, you can override certain settings in shortcode parameters.
Possible parameters:
- show_title – show / hide slider block title
Possible values:
- 1
- 0
- autoscroll – Change to any integer ( for example 5000 to play every 5 seconds).
Set to 0 to disable autoscroll - scroll_items – Slide per item or per page
Possible values:
- item
- page
- rewind – Slide to first item or stop at last item
Possible values:
- 1
- 0
- slide_speed – Slide speed in milliseconds
- stop_on_hover – Stop autoplay on mouse hover
Possible values:
- 1
- 0
- navigation – Display “next” and “prev” buttons.
Possible values:
- 1
- 0
- navigation_mode – Show navigation arrows permanently or on hover.
Possible values:
- always
- hover
Widget
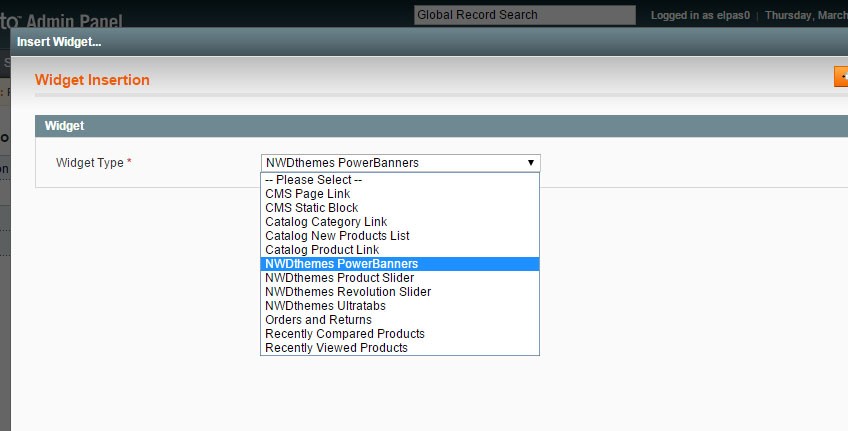
To insert Powerbanners Slider Widget in CMS editor click “”Insert Widget”” icon or button. Select NWDthemes Powerbanners widget. In Widget Options select slider you want to insert and click Insert Widget button.
To create Powerbanners Slider Widget Instance go to CMS > Widget section page and push Add New Widget Instance button. Select NWDthemes Powerbanners widget type, choose design package/theme and click Continue. Fill Frontend Properties form giving widget instance name, assign store views and sort order. Click Add Layout Update button and select pages and block you want to display widget on. Switch to Widget Options tab and select slider for this widget instance. Click Save to update widget options.
Widget has same parameters as described in Shortcode
Magento Configuration
We do not provide support of magento core features. More inormation about Magento can be found in Useful links
Cache Management
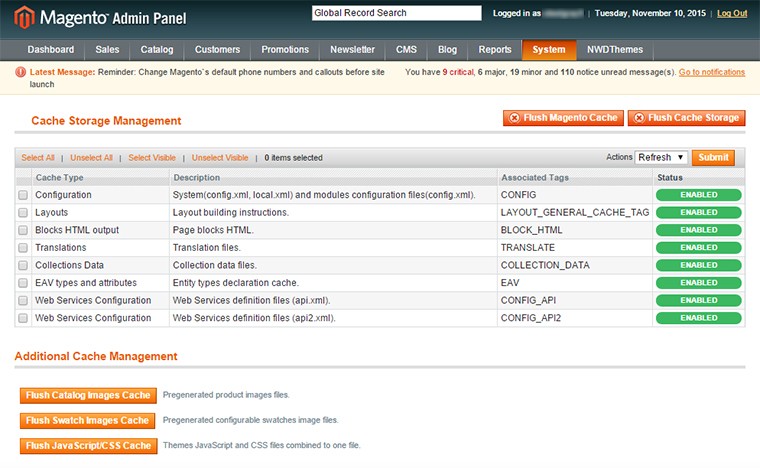
When making certain changes to Magento, such as modifying code files, it is necessary to clear the cache in order for the changes to become visible.
There are two ways to clear the cache in Magento:
Through the Magento Admin Panel
- Log in to your Admin Panel account
- Go to the System -> Cache Management section
- Click on the Flush Magento Cache button
Using SSH/FTP or the cPanel File Manager
Delete the contents of the var/cache/ folder using the following SSH command (MUST be executed from your Magento base directory):
rm -rf var/cache/*
OR
Delete the folder var/cache/ through your FTP client or using the cPanel File Manager.
Index Management
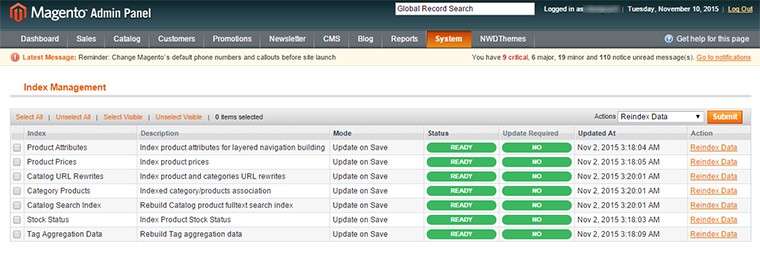
- Log in to Magento administrator control panel.
- Go To System > Index Management.
- On the left side is a list of categories that can be reindexed. Select the categories to reindex. If you want to run a reindex for all of the products, click “Select All”.
- From the Actions drop-down menu, select Reindex Data and then click Submit.
- Depending on how many categories, and the amount of information that needs to be reindexed, this could take a few minutes, or hours.
Help & Support
Useful links
Magento Installation
- Magento FAQ: http://www.magentocommerce.com/product/faq
- System Requirements: http://www.magentocommerce.com/system-requirements/
- Server Compatibility Check: http://www.magentocommerce.com/knowledge-base/entry/how-do-i-know-if-my-server-is-compatible-with-magento
- Installation Guide: http://www.magentocommerce.com/knowledge-base/entry/magento-installation-guide
Magento Configuration
- Video Tutorials – Magento Go http://go.magento.com/video-tutorials
- Magento Wiki http://www.magentocommerce.com/wiki/
- Magento Forum http://www.magentocommerce.com/boards/
- stackoverflow.com http://stackoverflow.com/questions/tagged/magento
- Magento Answers Stack Exchange http://magento.stackexchange.com/
Support Policy
Support hours: 10AM – 6PM GMT+1 time, Monday – Friday. The support response time is 24-48 hours.
Support for our items includes:
- Fixing bugs and reported issues
- Responding to problems regarding the item and its features
- Providing updates to ensure compatibility with new software versions
Item support does not include:
- Customization and installation services
- Support for third party software and plug-ins
- Support for Magento: configuration, installation, maintenance etc.